
“Indeed job posting API” means two completely different things, and the search results mix them together.
One group wants to publish jobs onto Indeed. The other wants to read what is inside a posting that already exists.
This guide is about the second one, and it is honest about the first. You cannot post jobs to Indeed through a public API, because that path runs through gated employer and applicant-tracking programs. You can read posting data through a third-party API: pass a job key or an Indeed URL, and get the title, company, salary, description, and benefits back as clean JSON. That is what the rest of this covers.
Does “Indeed job posting API” mean reading or posting?
It means both, depending on who is searching, and only one is available to you. Reading posting data is straightforward through a third-party API that returns normalized JSON. Publishing a job onto Indeed is not, because it runs through employer accounts and applicant-tracking integrations that Indeed controls. Sorting out which one you need saves a lot of wasted research.
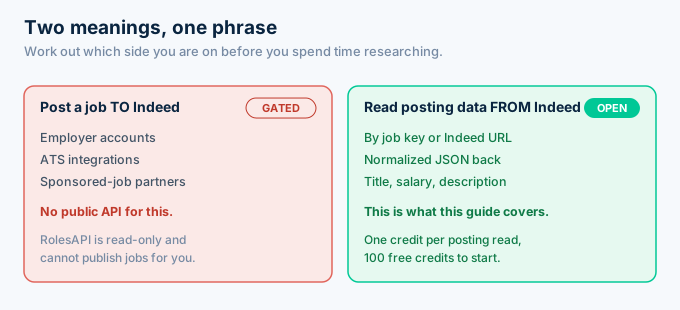
Check which side you are on before you go further.
If you are an employer trying to advertise a role, you want an Indeed employer account or your ATS vendor’s integration. Nothing in this guide will help with that.
If you are a developer who needs the contents of postings as data, keep reading. That is the part that works.
Can you post a job to Indeed through an API?
Not through a public one. Publishing to Indeed happens through employer accounts, applicant-tracking system integrations, and sponsored-job partner programs, all of which require an approved relationship with Indeed. There is no open endpoint a general developer can call to create a listing. RolesAPI is read-only and cannot post jobs on your behalf.
I want to be direct about that limitation.
Plenty of pages blur this line to capture the search traffic. It wastes your time, so here is the clean answer: reading is open through third parties, publishing is not.
If publishing is what you need, talk to your ATS vendor first. Most of the major ones already have an Indeed integration, which is far easier than trying to build one.
The reason the two sides differ is control. Indeed treats inbound listings as content it is responsible for, so it gates who can create them. Reading a public posting is a different question, and third-party providers serve it.
That asymmetry is not going to change. Plan around it rather than hunting for a workaround that does not exist.
What data is inside an Indeed job posting?
A posting holds more than the search card shows. The normalized object includes the title, company, location, a structured salary block with a min and max, the full description text, the benefits list, the posted date, and the job key. Search results give you the summary fields. Reading the posting gives you the long-form content underneath.
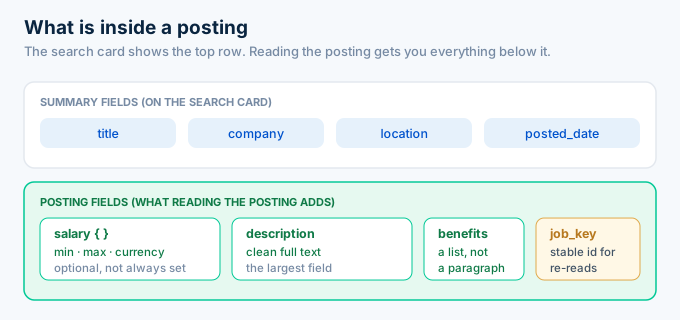
Here is a trimmed posting so the shape is clear.
{ "job_key": "a1b2c3d4e5f6", "title": "Senior Backend Engineer", "company": "Northwind Labs", "location": "Austin, TX", "salary": { "min": 160000, "max": 195000, "currency": "USD", "period": "year" }, "benefits": ["Health insurance", "401(k) matching", "Remote work"], "posted_date": "2026-07-16"}The description is the field most people are actually after. It carries the requirements, the responsibilities, and the language the employer used, which is where the useful signal lives.
Salary arrives structured rather than as a string. You compare salary.max across postings without writing a parser for “$160k to $195k a year”.
How do you read a posting by job key or URL?
You have two entry points that return the same object. If you already have the job key, call the role detail endpoint with it. If you have an Indeed viewjob link instead, pass the URL directly and let the API extract the key for you. Both cost one credit and return the identical normalized role.
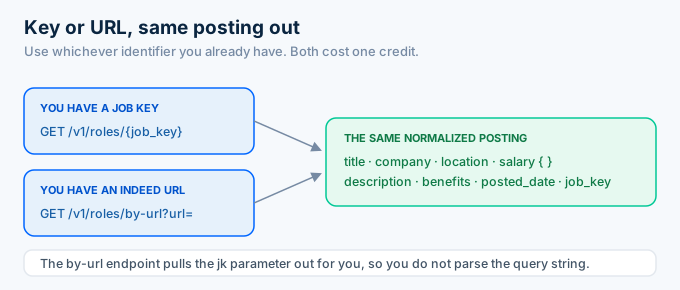
Reading by job key is the common path.
import os, requests
key = os.environ["ROLESAPI_KEY"]job_key = "a1b2c3d4e5f6"
r = requests.get(    f"https://api.rolesapi.com/v1/roles/{job_key}",    headers={"Authorization": f"Bearer {key}"},)posting = r.json()["data"]
print(posting["title"], posting["salary"])
If a user pastes an Indeed link into your product, use the URL endpoint instead. You skip writing a parser to pull the jk= parameter out of the query string yourself.
curl -G https://api.rolesapi.com/v1/roles/by-url \ --data-urlencode "url=https://www.indeed.com/viewjob?jk=a1b2c3d4e5f6" \ -H "Authorization: Bearer rk_live_your_key"Keep the job key once you have it. It is stable, so it is the right primary key for storing and refreshing a posting later.
Where do job keys come from in the first place?
Job keys come from three places: a search you ran, an Indeed URL a user gave you, or your own database from an earlier read. Search is the usual source, because it returns summaries that each carry a key. You then read full posting data only for the roles you care about, which is why the two-step pattern saves credits.
Search first, read second. That order matters.
A search that returns 50 summaries costs 50 credits, and you might only need the full posting for 10 of them. Reading all 50 in full would cost you 50 more for nothing.
User-supplied URLs are the second source. Someone pastes an Indeed link into your app, and you turn it into structured data on the spot.
Your own database is the third. Once you have stored a key, re-reading that posting later is one call, no search required.
Keys are worth treating as an asset. A stored key is a permanent handle on a posting, so building up a key set over time is cheaper than re-running the same searches.
That is the difference between a pipeline and a one-off script. The script searches every run, while the pipeline searches once and refreshes by key afterwards.
How do you handle the description field?
The description is the largest field and the one most worth planning for. It arrives as clean text rather than markup, so you can index it, run it through a model, or render it directly. Because it is big, it is also the field you should skip when a view does not display it, which is exactly what the sub-resource endpoints are for.
Store it separately if you are running a search index.
Full-text search over descriptions is where most of the useful querying happens, and keeping it in its own column or index keeps the rest of your reads fast.
For models, the clean text matters more than it sounds. A scraped description carries navigation, boilerplate, and stray markup that costs you tokens and pollutes the signal.
If you only need a summary, generate it once at ingest and store it. Re-summarizing the same posting on every page view is wasted compute.
How do you read only part of a posting?
Use a sub-resource when you need one slice instead of the whole object. Four are available: description, benefits, salary, and company. Each returns just that block for the same single credit, which keeps your responses small and your app fast when a feature only renders one part of the posting.
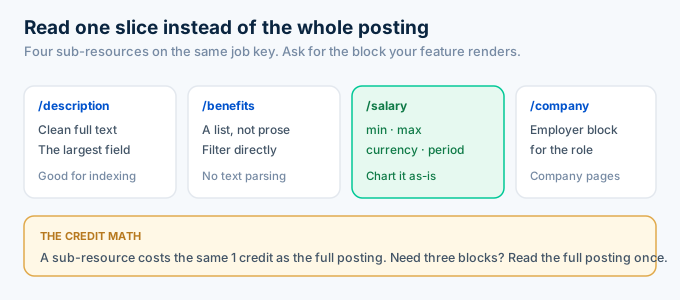
A salary widget is the clearest example.
curl https://api.rolesapi.com/v1/roles/a1b2c3d4e5f6/salary \ -H "Authorization: Bearer rk_live_your_key"That returns the pay block alone. No description text to transfer, parse, or store.
The description sub-resource is worth knowing about too. It returns clean text rather than the markup soup a scraper would hand you, which matters if you are running it through a model or an index.
Pick the narrowest endpoint that answers your question. It moves less data and is easier to cache.
Note that a sub-resource costs the same single credit as the full posting. The saving is in bandwidth, parsing, and storage, not in your credit count.
So if you need three of the four blocks, read the full posting once instead of making three sub-resource calls. One credit beats three.
How do you read many postings at once?
Use the batch endpoint. It accepts up to 500 job keys or URLs in a single async job, processes them in the background, and fires a signed webhook at your server when it finishes. This keeps a long read off your request path, avoids timeouts, and is far cleaner than looping 500 individual calls.
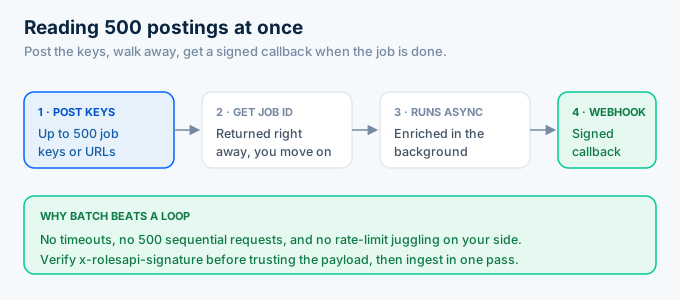
The pattern is simple. You post the keys, get a job id back immediately, and move on.
When the job completes, RolesAPI signs a request to your webhook URL. Verify the x-rolesapi-signature header before trusting the payload, then ingest the postings in one pass.
If you cannot accept inbound webhooks, poll the jobs status endpoint instead. Webhooks are cheaper, because you react once rather than asking repeatedly.
Batch is also the right tool for refreshing. Collect the keys you already store, post them in one job, and update your records when the callback lands.
How do you handle postings that close?
Postings expire, and your copy will go stale unless you plan for it. Use the posted date to age roles out of your index, and re-read on a schedule to catch closures. A posting from four months ago is usually filled, so showing it costs you user trust more than the credit saved by skipping the refresh.
Pick an age limit and enforce it.
Most job boards drop postings after 30 to 60 days, which is roughly when a listing stops being useful to a candidate anyway.
Re-reading in batch is the cheap way to verify. One async job over your stored keys tells you what is still there.
The trade is credits against freshness. Refresh weekly and you spend a fraction of what a daily re-read costs, and for most products nobody notices the difference.
What can you build with Indeed posting data?
Posting data powers anything that needs the content of a role rather than just its title. Salary tools read the pay block across thousands of postings. Job boards render full descriptions on detail pages. Market research counts skills and requirements across a market. AI agents summarize a posting or compare it against a candidate’s background.
The description field does most of the heavy lifting.
It is where requirements, seniority signals, and the employer’s actual language live, which is exactly what a model or an analysis pipeline wants to read.
Benefits data is underused. Because it comes back as a list rather than a paragraph, you can filter and compare on it without any text processing.
The salary block makes comparisons trivial. Structured min and max values across many postings turn into a chart without a cleanup step in between.
One caveat worth stating. Not every posting lists a salary, so your code should handle a missing pay block rather than assuming it is always there.
The same applies to benefits. Treat both as optional fields and your ingest stays clean when an employer leaves them out.
What does reading postings cost?
One credit per answer, which works out to about half a cent. Reading one posting costs one credit, a sub-resource costs one credit, and a batch of 500 costs 500. RolesAPI starts free with 100 credits and no card, then 5 dollars a month for 1,000. Caching what you already fetched is the simplest way to keep that number low.
Postings do not change often once published.
That makes them ideal to cache. Store the role object keyed by job key and serve repeats from your own database rather than paying to re-read the same content.
Refresh on a cadence that matches your product. A job board might re-check weekly to catch closures, while a research dataset can stay frozen at the moment you captured it.
Failed calls do not bill you. A 401 or a 429 costs nothing, so retries during development are free.
That makes the free tier genuinely usable for building. You can wire the whole read path, make mistakes, and still have credits left for real postings.
Frequently asked questions
What is an Indeed job posting API?
An Indeed job posting API lets you read the contents of a job posting programmatically. You pass a job key or an Indeed viewjob URL and get back a normalized role object with the title, company, location, salary, description, and benefits. RolesAPI provides this as a REST API, starting free with 100 credits and no card.
Can I post a job to Indeed with an API?
Not through a public API. Publishing jobs to Indeed runs through employer accounts, applicant-tracking integrations, and sponsored-job partner programs, all of which are gated. RolesAPI is read-only, so it cannot post jobs for you. It reads existing public postings and returns them as structured data.
How do I get the data from an Indeed job posting?
Call the role detail endpoint with the posting’s job key, or pass the Indeed viewjob URL directly if that is what you have. Both return the same normalized role object. One call costs one credit, and you can request a single sub-resource instead when you only need the salary or the company block.
What fields does an Indeed job posting include?
A normalized posting includes the title, company, location, a structured salary block, the full description, benefits, the posted date, and the job key. The job key is the stable identifier you use to re-read or refresh that posting later. Every posting comes back in this same shape.
Can I read many Indeed postings at once?
Yes. The batch endpoint accepts up to 500 job keys or URLs in a single async job. RolesAPI processes them in the background and fires a signed webhook at your server when the job finishes. This is far more efficient than looping single calls and keeps long work off your request path.
How much does reading Indeed posting data cost?
One credit per answer, which is about half a cent. Reading one posting costs one credit, and a batch of 500 costs 500. RolesAPI starts free with 100 credits, then 5 dollars a month for 1,000. Caching postings you already fetched is the simplest way to keep the number down.
Read your first posting today
If you came here to publish a job, your ATS or an Indeed employer account is the right route, and no public API will do it for you.
If you came to read posting data, that takes one call. Grab a job key or an Indeed link, send the request above, and you get the title, salary, description, and benefits as clean JSON.
Create a free RolesAPI key and try it against a real posting. You get 100 credits and no card. For the wider picture, read the complete Indeed API guide, the endpoint documentation, or the guide to pulling listings into your app.